The idea sounds simple.
Take two heat exchangers, place a Thermo Electric Cooling module between them and produce enough cooling to keep a motorcycle helmet comfortable.
If you wish to attempt your own A/C system, you do not have to use the products that I used in my attempt. Any brand mentioned or show in this paper is not an endorsement of that company.
I wanted to keep the system as small as possible. Going with a bigger container would have made prototyping a bit easier however.
I used a small backpack, 7" X 9'X 3" from a thrift store. I had to add longer straps.
The fan is attached to the radiator. I don't think it will be needed when moving but should help when stopped. The bag work by unzipping it and letting the air flow through the radiator.
For the exchangers I used two Corsair Hydro Series H60 liquid cpu cooling systems. This is a picture of a unit as it comes out of the box.
These units are used to liquid cool personal computers that have been modded and run higher clock speeds and heat than the cpu can handle. Included is a radiator, fan, cold plate and mounting hardware.
The first thing is to remove the provided liquid tubing. This instantly voids the warranty.
Next I polished the copper cold plates to a mirror finish because a rough surface would be less able to transfer heat or cold through conduction.
"To insulate around the TEC I used Aerogel. This material is a good
thermal insulators because it almost nullify the three methods of
heat transfer (convection, conduction, and
radiation). Aerogel is a good
conductive
insulators because it is composed almost entirely from a gas, and
gases are very poor heat conductors. Silica aerogel is especially good
because silica is also a poor conductor of heat. It is also a good
convective inhibitors because air cannot circulate through the lattice. " ~Wiki
The burn mark is where I held a blow torch for over a minute while my hand was on the other side. The burned area was glowing white, I felt no heat.
The Aerogel shatters microscopically if compressed so I had to peel off 1mm of the insulation to match the height of the TEC with installed thermal pads.
The TEC1-12709 is a Ceramic Plate Thermoelectric Cooling Module that is a heat exchanger. It operates at 12 volts, 45 watts and 3 amps. Also know as a
Peltier chip.
Assembling the exchange units.
 |
| Originally I was going to use Mylar on either side of the aerogel for added insulation but decided it was overkill. |
 |
| I started by placing the thermal pad on the Hot side of the exchanger |
 |
| Aerogel is placed |
 |
| TEC added. Hot side to hot exchanger. |
 |
| The Cold exchanger ready to bolt on. |
 |
| Assembled exchange unit. |
|
|
|
|
|
Installing the exchange unit in the back pack.
I first cut a hole the size of the fan blades in the backpack. I installed the radiator and fan on the outside of the pack.
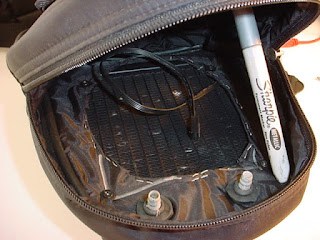
Next comes the exchanger. I used a piece of Styrofoam to fill and flatten the bottom of the pack and used a zip tie to attach it to the unit. The Hot side goes to to fan. Vinyl tubing was used between the radiator and exchange unit.
 |
| It fits! |
Now for the cooling side.
I had to make the radiator for the head. I could not afford a Cool Shirt or Hood so I made my own.
 |
| I drew this water flow pattern and place a doubled sheet of vinyl sheet from the sewing center |
 |
| I used a soldering iron to seal the plastic. |
 |
| This is the pad that sits under the helmet. | | | |
| | |
Surgical tubing with a hard plastic tube is sealed with silicone. It is covered with a scrunchy type cotton fabric. The pad connects to the cold side of the exchanger.
The power is supplied through a cord which plugs into an installed outlet connected to the motorcycle battery.
 |
| Completed unit, ready to test! |
|
|
Next, testing.


